The SDL Tridion Reference Implementation (TRI) comes with out of the box controllers for loading and rendering pure content-based models. However, most web applications need to blend content with data from other sources before rendering. TRI is designed with this in mind, this post introduces the pattern for creating custom controllers which merge CMS managed content with external data.
External Data Sources
Search Engines, CRM, ERP systems, Product Catalogues… There are a large amount of systems whose data that you might need to integrate with your CMS managed web application. As an MVC web application developer you probably want to develop self-contained, swappable and unit testable integrations with a particular data provider. While working on a soon to be released Search Module (based on SI4T and Solr) and helping a fellow MVP sketch out a SmartTarget integration for the TRI a common pattern for such integrations emerged.
1. Create an Area
TRI uses ASP.NET MVC Areas to enable you to create self-contained pieces of functionality as “Modules”, so the first step is to create a new Area in your MVC application to contain your custom model(s), view(s) and controller. You will need to create an Area Registration class, which defines a default route. As explained in my previous post, routing is only really applied at page level, so this default route has no influence on how URLs are mapped to controllers. However you do need the default route to ensure that there is an entry in the route table for this controller.
2. Define your Model
Next define a Model class, which represents the data you want to render. Identify which bits (if any) should be controlled by Editors and thus managed in the CMS. You should inherit your class from the Sdl.Web.Common.Models.EntityBase class as this will take care of some base mapping behavior, such as ensuring that the CMS managed parts of your model are Experience Manager editable:
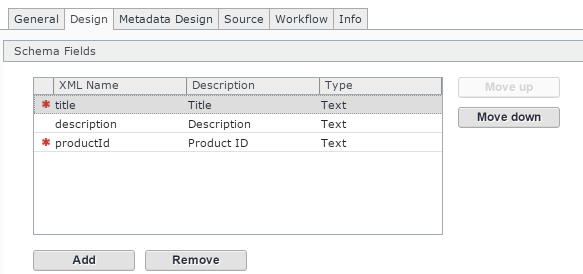
3. Configure in CMS
If you already have a schema and content to represent the CMS elements, then you need to map these to your model. This can be done by using SemanticProperty attributes on your model to define which schema fields match which properties.
If creating a new schema, you can save yourself this effort by simply matching your schema field XML names to the model properties (don’t forget to use camelCasing, so the property ProductId would be a schema field named productId).
4. Create a Provider for your data
Define an Interface for your external data system, and implement this interface as a Data Provider:
You will need to configure the provider mapping in the Unity.config file in the root of your application:
5. Create a Controller
Create a controller which inherits from the BaseController, provide a constructor where you specify the ContentProvider and Renderer, plus your external Data provider
Override the ProcessModel method calling the base class, and then your provider to pull in additional data
6. Create a View
Make sure you put it in the right place, so as to be discovered by the web application. For a Products Area/Module with Products controller, it should be in /Areas/Products/Views/Products/
Note the use of the @Markup.Entity and Property helper methods – these take care of adding XPM and other Semantic markup.
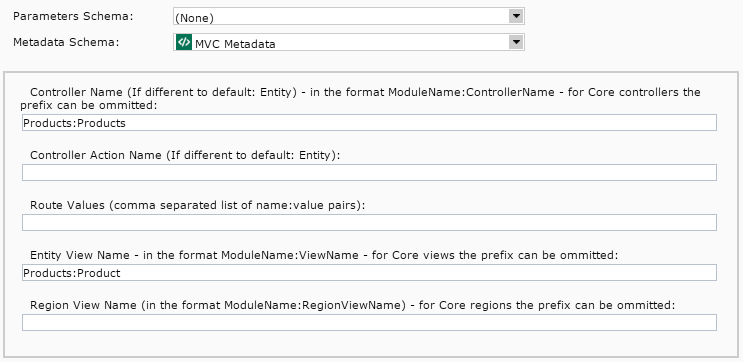
7. Create a Component Template and map to your Area/Controller/View
All TRI Component Templates contain the same generic TBBs to publish content in a data format, so you can just copy an existing one if you like and update the referenced schemas. Select the MVC Metadata schema and set appropriate values.
When you are done, (re)publish a page with your component and template on and test it out.

8. More options
You don’t have to limit yourself to a single controller Action (for example, the default Entity action). Its possible to use the CT metadata to map each of your CTs to separate actions, and even specify route values (action parameter values) for each. When implementing a custom Action, you will want to ensure you use the following code as a basis:
The first example does not have any custom route values (parameters), the second has an additional myCustomParam value, which can be set on the CT metadata:
